CCC Playground
Learn to use the CCC Playground — an in-browser IDE for writing, running, and sharing CKB transaction scripts.
The CCC Playground is an in-browser IDE where you can write, execute, and visualize CKB transactions — no local setup required. It is the fastest way to learn CCC and experiment with CKB.
What you'll get
After this guide you'll be able to:
- Understand how the Playground works and how to use it
- Use the Playground for debugging and visualizing CKB transactions
- Write, run, and share CKB transaction scripts in the browser
- Build and send transactions using the CCC SDK
Interface overview

The Playground is split into two panels:
- Left panel — a Monaco (VS Code) editor with full TypeScript IntelliSense for CCC types
- Right panel — a Console that displays logs, errors, and interactive transaction visualizations
Toolbar buttons
| Button | Description |
|---|---|
| Testnet / Mainnet | Toggle between CKB testnet and mainnet |
| Format | Auto-format your code with Prettier |
| Run | Execute the code and auto-step through render() breakpoints |
| Step | Execute in debug mode — pause at each render() and click Continue to advance |
| Share | Publish your code to Nostr relays and generate a shareable URL |
| Connect | Open the wallet connector to sign and send real transactions. Once connected, this button will display the CKB address of the connected wallet. |
| Console | Show the Console tab |
| Clear | Clear all console output |
| About | Show links to docs, GitHub, faucet, and explorer |
Available imports
Every script in the Playground runs in a sandboxed TypeScript environment. The following modules are available:
import { ccc } from "@ckb-ccc/ccc";               // Core CCC SDK
import { render, signer, client } from "@ckb-ccc/playground"; // Playground helpers
@ckb-ccc/playground exports
| Export | Type | Description |
|---|---|---|
signer | ccc.Signer | The active signer — either the connected wallet or a built-in read-only key |
client | ccc.Client | The active CKB client (testnet or mainnet) |
render(...args) | Promise<void> | Log values to the Console and pause execution (acts as a breakpoint in Step mode) |
You can also use console.log() and console.error() — they output to the Console panel.
If no wallet is connected, signer defaults to a built-in public key signer. You can read chain data and build transactions, but sending them requires a connected wallet.
After understanding the basic interface and available tools, let's explore the core capabilities of the Playground through practical examples.
Example 1 — Transfer CKB
This is the default example that ships with the Playground. It demonstrates the declare → fill → fee → send pattern.
Open the Playground and paste this code (or simply use the default):
import { ccc } from "@ckb-ccc/ccc";
import { render, signer } from "@ckb-ccc/playground";

console.log("Welcome to CCC Playground!");

// The receiver is the signer itself on mainnet
const receiver = signer.client.addressPrefix === "ckb" ?
  await signer.getRecommendedAddress() :
  "ckt1qzda0cr08m85hc8jlnfp3zer7xulejywt49kt2rr0vthywaa50xwsqflz4emgssc6nqj4yv3nfv2sca7g9dzhscgmg28x";
console.log(receiver);

// Parse the receiver script from an address
const { script: lock } = await ccc.Address.fromString(
  receiver,
  signer.client,
);

// Describe what we want
const tx = ccc.Transaction.from({
  outputs: [
    { capacity: ccc.fixedPointFrom(100), lock },
  ],
});
await render(tx);

// Complete missing parts: Fill inputs
await tx.completeInputsByCapacity(signer);
await render(tx);

// Complete missing parts: Pay fee
await tx.completeFeeBy(signer, 1000);
await render(tx);
What happens when you click Run
- The code creates a transaction with one output of 100 CKB
render(tx)pauses and displays the transaction in the Console — you'll see the output Cell but no inputs yetcompleteInputsByCapacityfinds live cells to cover 100 CKB, thenrender(tx)shows the transaction again — now with inputscompleteFeeByadds a change output and adjusts for the fee, thenrender(tx)shows the final transaction
Click Step instead of Run to pause at each render() call. Click Continue to advance to the next breakpoint. This is useful for studying how CCC builds a transaction step by step.
Now that we've mastered the basic transfer flow, let's explore a more complex scenario — issuing a token on chain.
Example 2 — Issue a custom UDT token
This example shows how to issue a UDT (User Defined Token) — a fungible token on CKB:
import { ccc } from "@ckb-ccc/ccc";
import { render, signer } from "@ckb-ccc/playground";

// Get the signer's lock script — this will be the token owner
const lock = (await signer.getRecommendedAddressObj()).script;
console.log("Token owner lock:", lock);

// Build a transaction with the UDT output
const tx = ccc.Transaction.from({
  outputs: [{ lock }],
  outputsData: [ccc.numLeToBytes(1000000, 16)], // initial supply: 1,000,000 tokens
});
await render(tx);

// The Type script for xUDT uses the first input's outPoint as a unique ID
// We need to add inputs first, then set the Type script
await tx.completeInputsByCapacity(signer);
await render(tx);

const firstInput = tx.inputs[0];
const typeScript = await ccc.Script.fromKnownScript(
  signer.client,
  ccc.KnownScript.XUdt,
  (await firstInput.getCell(signer.client)).cellOutput.lock.hash(),
);
await render(tx);

tx.outputs[0].type = typeScript;
await render(tx);

// Recalculate inputs (the Type script changes occupied capacity)
await tx.completeFeeBy(signer, 1000);
await render(tx);
About sending transactions: The above examples are for demonstration purposes only — they build the transaction to its final state without actually sending it. To broadcast the transaction to the chain, call signer.sendTransaction(tx) at the end:
// Sign and broadcast the transaction, returning the transaction hash
const txHash = await signer.sendTransaction(tx);
console.log("Transaction sent:", txHash);
Make sure you have connected a wallet and that the address has sufficient CKB balance.
Playground's capabilities go far beyond building transactions. All methods provided by the CCC SDK can be run directly here, meaning you can write arbitrary scripts to perform various on-chain operations — for example, batch asset management, tracking large on-chain transactions, analyzing cell state distributions, and more. Below is a simple data query example.
Example 3 — Query on-chain data
You can use the Playground to explore on-chain data without building any transaction:
import { ccc } from "@ckb-ccc/ccc";
import { signer, client } from "@ckb-ccc/playground";

// Get the current tip block number
const tip = await client.getTip();
console.log("Current tip block:", tip.toString());

// Get the signer's address
const address = await signer.getRecommendedAddress();
console.log("Signer address:", address);

// Get the signer's balance
const balance = await signer.getBalance();
console.log("Balance:", ccc.fixedPointToString(balance), "CKB");
Understanding the Cell visualization
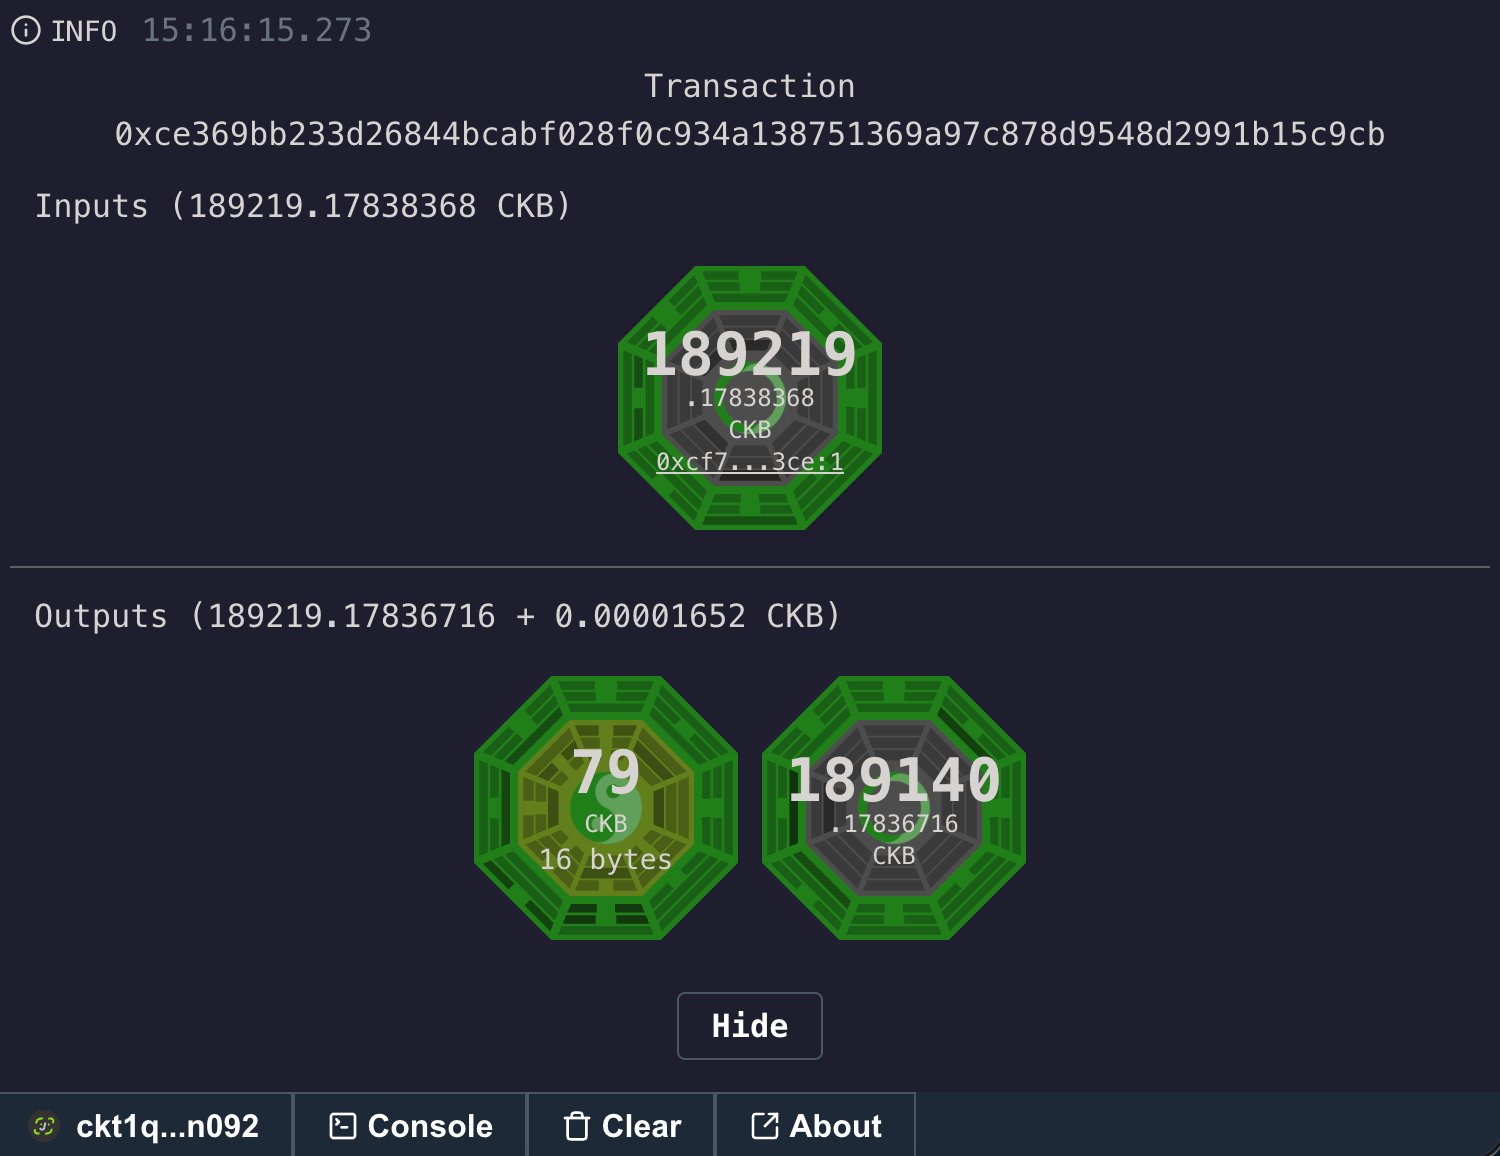
When render() receives a ccc.Transaction, the Console displays an interactive transaction diagram. Each Cell is drawn as a circular glyph with three visual layers, as shown in the following figure:
Bagua — the outer and middle rings
Each Cell renders two concentric Bagua (eight-trigram) rings:
- Outer ring — derived from the Cell's Lock Script
- Middle ring — derived from the Cell's Type Script (if any)
The trigram pattern is deterministic: getScriptBagua(script) extracts 24 bits from the script hash (hash & 0xffffff000 >> 12) and splits them into eight 3-bit trigrams. Each trigram draws three lines — a solid line for bit 0 and a broken line for bit 1 — following the classical trigram encoding (☰ Qian, ☷ Kun, etc.).
The color of each ring is also derived from the script hash: hash & 0xfff % 360 gives the HSL hue. This means:
- Cells with the same Lock script share the same outer ring color and pattern
- Cells with the same Type script share the same middle ring color and pattern
- You can visually identify which Cells belong to the same owner or token type at a glance
Taiji — the center circle
The center of each Cell displays a slowly spinning Taiji (yin-yang) symbol:
- The yang (dark) side uses the Lock script color
- The yin (light) side is translucent white
- A small colored dot inside represents the free capacity percentage — how much capacity in this Cell is not occupied by data. Its diameter scales proportionally, and its color matches the Type script color
This tells you at a glance how "full" a Cell is.
Reading the numbers
Below the Taiji symbol you'll see:
- Capacity in CKB (large number)
- DAO profit (if the Cell is in NervosDAO, shown as
+ X CKB) - A shortened OutPoint (
txHash:index) linking to the CKB Explorer - Data size in bytes (if the Cell contains data)
Click on any Cell to expand its full details: OutPoint, capacity, Lock script (address), Type script, and raw output data.
Sharing code
Click Share to publish your code to a set of Nostr relays. The Playground generates a nevent identifier and redirects to a URL like:
https://live.ckbccc.com/?src=nostr:nevent1...Anyone who opens this URL will see your exact code loaded in the editor. Code is stored on decentralized Nostr relays — no centralized server involved.
You can also load code from any URL by passing a src query parameter:
https://live.ckbccc.com/?src=https://raw.githubusercontent.com/sporeprotocol/dob-cookbook/refs/heads/main/examples/dob0/1.colorful-loot.tsTips
- Use
render()liberally — it's your primary debugging tool. Pass a transaction at each stage to see how CCC mutates it. - Step mode is your friend — click Step to pause at each
render(), inspect the state, then click Continue. Great for understanding the transaction lifecycle. - Code persists in localStorage — if you don't use a
?src=URL, your code is saved automatically and restored when you return. - Get testnet CKB — click About → CKB Testnet Faucet to fund your testnet address, or visit faucet.nervos.org directly.
- Full IntelliSense — the editor provides autocomplete and type-checking for all CCC types, plus
@noble/curves,@noble/hashes, and@nervina-labs/dob-render. - Share to collaborate — after writing a script, click Share to generate a link that others can open to reproduce your code environment.
Important Notes
Before running any script, make sure the network environment shown in the bottom-left corner (Testnet or Mainnet) is correct. Operations on mainnet assets are irreversible.
- Testnet first, then Mainnet — any script should be run and confirmed to behave as expected on the testnet before switching to the mainnet. Never operate on mainnet assets directly.
- Check connection status — make sure the correct wallet and network are connected in the bottom-right corner before sending transactions.
- Minimum CKB capacity — each Cell must have at least 61 CKB to cover on-chain storage fees. If the output capacity is set too low, the transaction will be rejected by the node.
- Transactions are irreversible — once a transaction is confirmed on-chain, it cannot be undone. When operating on mainnet assets, it is recommended to carefully review the inputs and outputs of the transaction using
render()first. - Browser refresh — code is automatically saved in localStorage, so refreshing the page will not lose your work. However, if a
?src=URL is used, the code comes from an external source, and local modifications will not override the URL parameter. - Execution timeout — scripts in the Playground run in the browser's main thread. If you write long loops or make many RPC calls, it may cause the page to freeze. It is recommended to execute in steps.
Next steps
- Compose Transactions — the full guide to building and sending transactions.
- UDT Tokens — issue and transfer fungible tokens.
- Spore Protocol — create on-chain digital objects.
- Connect Wallets — integrate wallet connections into your own app.